Hello my little buttons!
You may not know but I’m actually a nail technician, mainly offering Gelish, which is a gel polish that lasts for up to 3 weeks. A huge passion of mine is nail art, it’s part of the reason I love my job so much. Getting to be creative and coming up with really bespoke nails for my customers. It’s also where the name buttonnailslovesmakeup comes from as my business is called Button Nails! http://www.facebook.com/buttonnails
One design that is incredibly popular, and a lot easier than it looks, is leopard print nails. Sure you can buy nail wraps but nothing feels better than saying your nail art was hand painted. Achieving this yourself is also something to be proud of, so here are my tips and tricks on painting leopard print. I have used Gelish in these photos but it can be done with polish too you just might need to work a bit quicker. I will explain this a bit later on.

- Gently push back your cuticles and shape your nails.
- Choose your colours! For this demonstration I chose these particular colours to make it easier to see what I’ve done but u can use nearly any colours.
- Base coat.
- Paint your nails like normal, I chose white to make the brighter colours really pop.
- Cure in your light or leave to dry.
- Pour out a small blob of a darker colour gel/polish onto a plate or plastic lid. Something you can clean away the excess off after. For gel polish your in no rush as it won’t cure without an uv/led light but if your using polish it drys fairly quick so your better off pouring out a small amount at a time rather than wasting large amounts. Also don’t use anything fast drying at this stage as it will make this harder!
- Using a dotting tool (mine are £2 from eBay and came in 6 different sizes) use the tiny ball on the end to dab into the polish/gel and place on your nail making small semi circles, bearing in mind you will be adding a dot of colour inbetween. Don’t try and cram to many in, place small dots in between to add to the effect.
- Cure in your light or leave to dry
- With your final colour add small dots in-between the semi circles then leave to dry or cure.
- Top coat.
Tadaaa your done! This might take some practice but once you get into the swing of it it’s easy and fun! Here are some other examples of how I have used leopard print with different colours and designs.

Here I used beiges and browns but to mix it up painted a ribbon and bow.
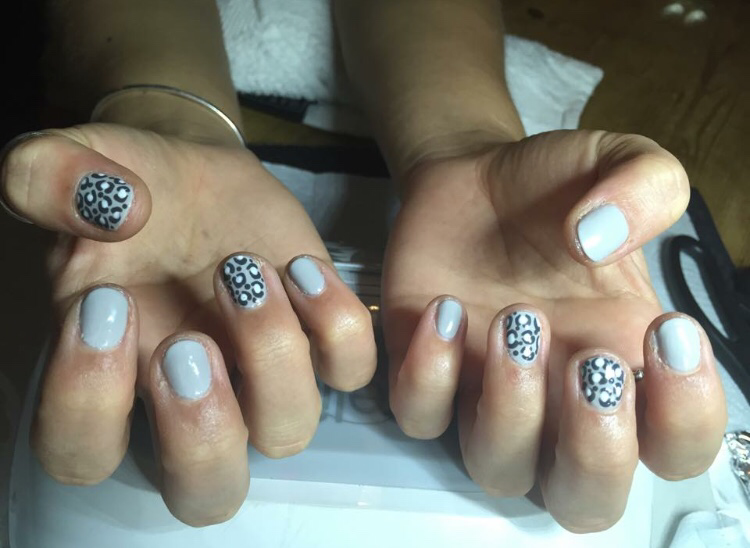
Here I used dark and light grey with white and a matte top coat.

Here I used yellow with grey to soften the look.
 Pale pink with soft greys is also very popular.

Last but not least to add a pop of colour you can have a glittery colourful feature nail, create what you want to create and have fun doing it! xxx

OMG they look fantastic. Love this post. Would be so lovely if you could check out my latest post too xxx
LikeLike