I can’t get enough of coloured eyeliners, here are some of the ones I can’t live without!

 
Hello my little buttons!

I just love coloured liners! I really can’t have too many, I put myself on a ban a while ago which im pretty sure needs to be broken. My favourite black and nude liners are Rimmel Scandal eyes, i embarrassingly  don’t own any of the coloured ones. It literally feels like a crime so that’s what I’ll be getting on payday! I love how versatile coloured liners are, you can go all out colourful and crazy or if your more of a neutral person use your Browns and creams and just have a pop of colour in the waterline, or just underneath with a nude liner in the waterline to really open up the eyes. 

Here are a few of my favourites.

Most affordable! 

 
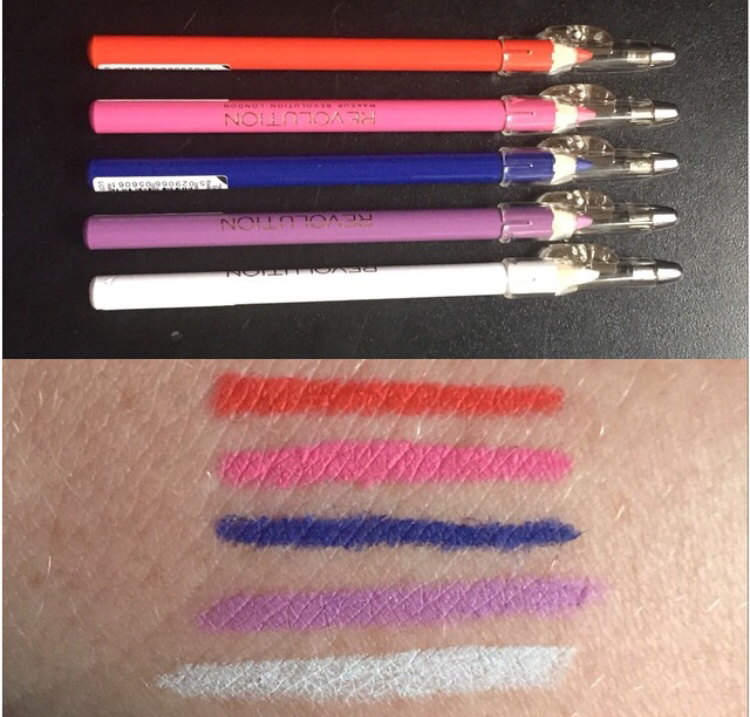
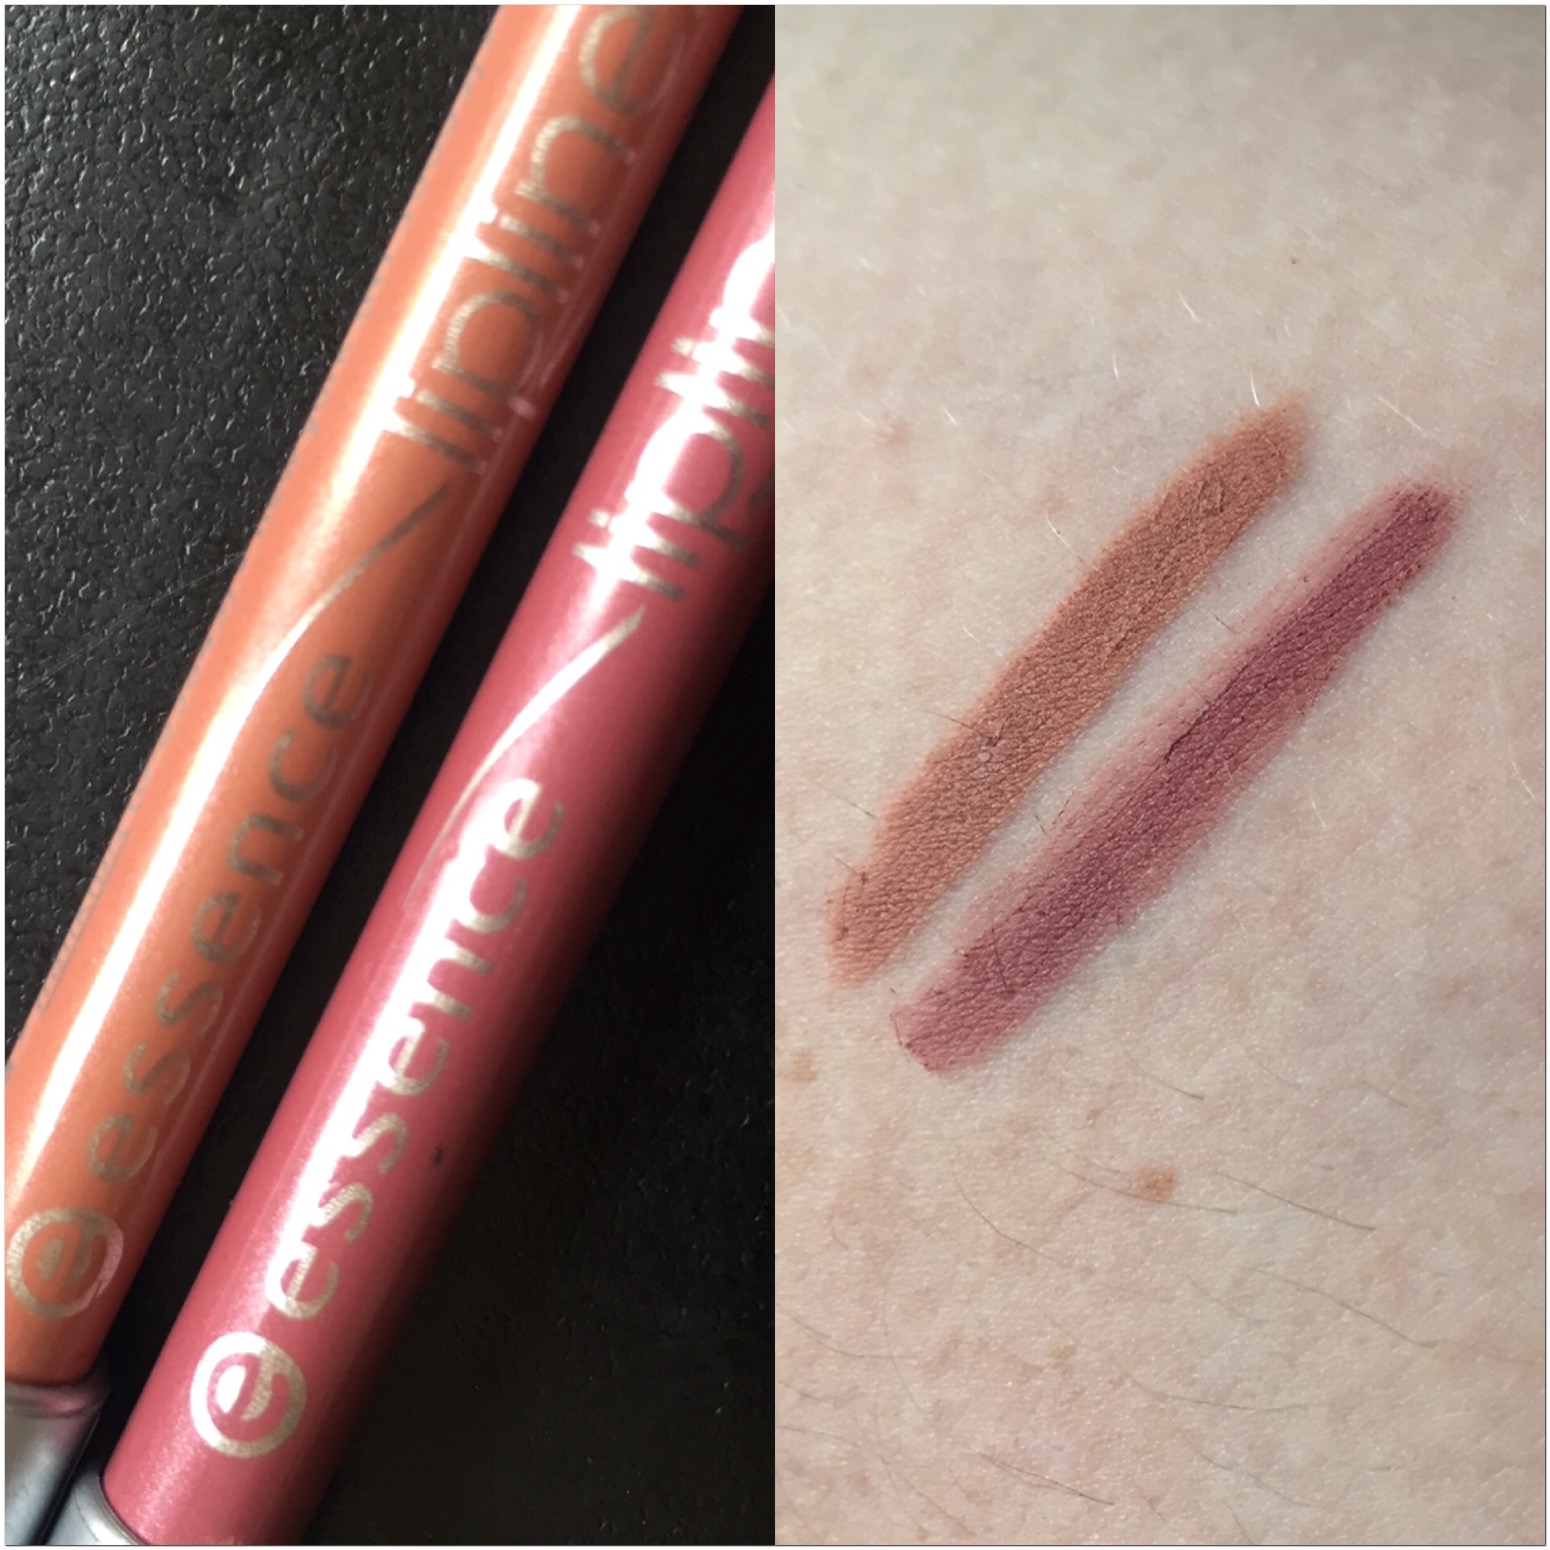
MakeupRevolution Hypocrisy eyeliners/lip liners £1 each available at http://www.makeuprevolution.com or in some superdrugs. 

These are multi purpose super affordable liners, some of these colours are crazy. I was so impressed with these, smooth and cramy they last really well on the waterline as well as just underneath. Which is hard to find in a coloured liner. You can have some real fun with these colours, my favourites by far are the blue and lilac. I wasn’t a huge fan of the red, it really stained my eyes and made me look ill. Although it would love fabulous just above some winged out black liquid liner, which in hinds sight I should of tried lol.  Here are some looks I have done with them.


 Most metallic!

 
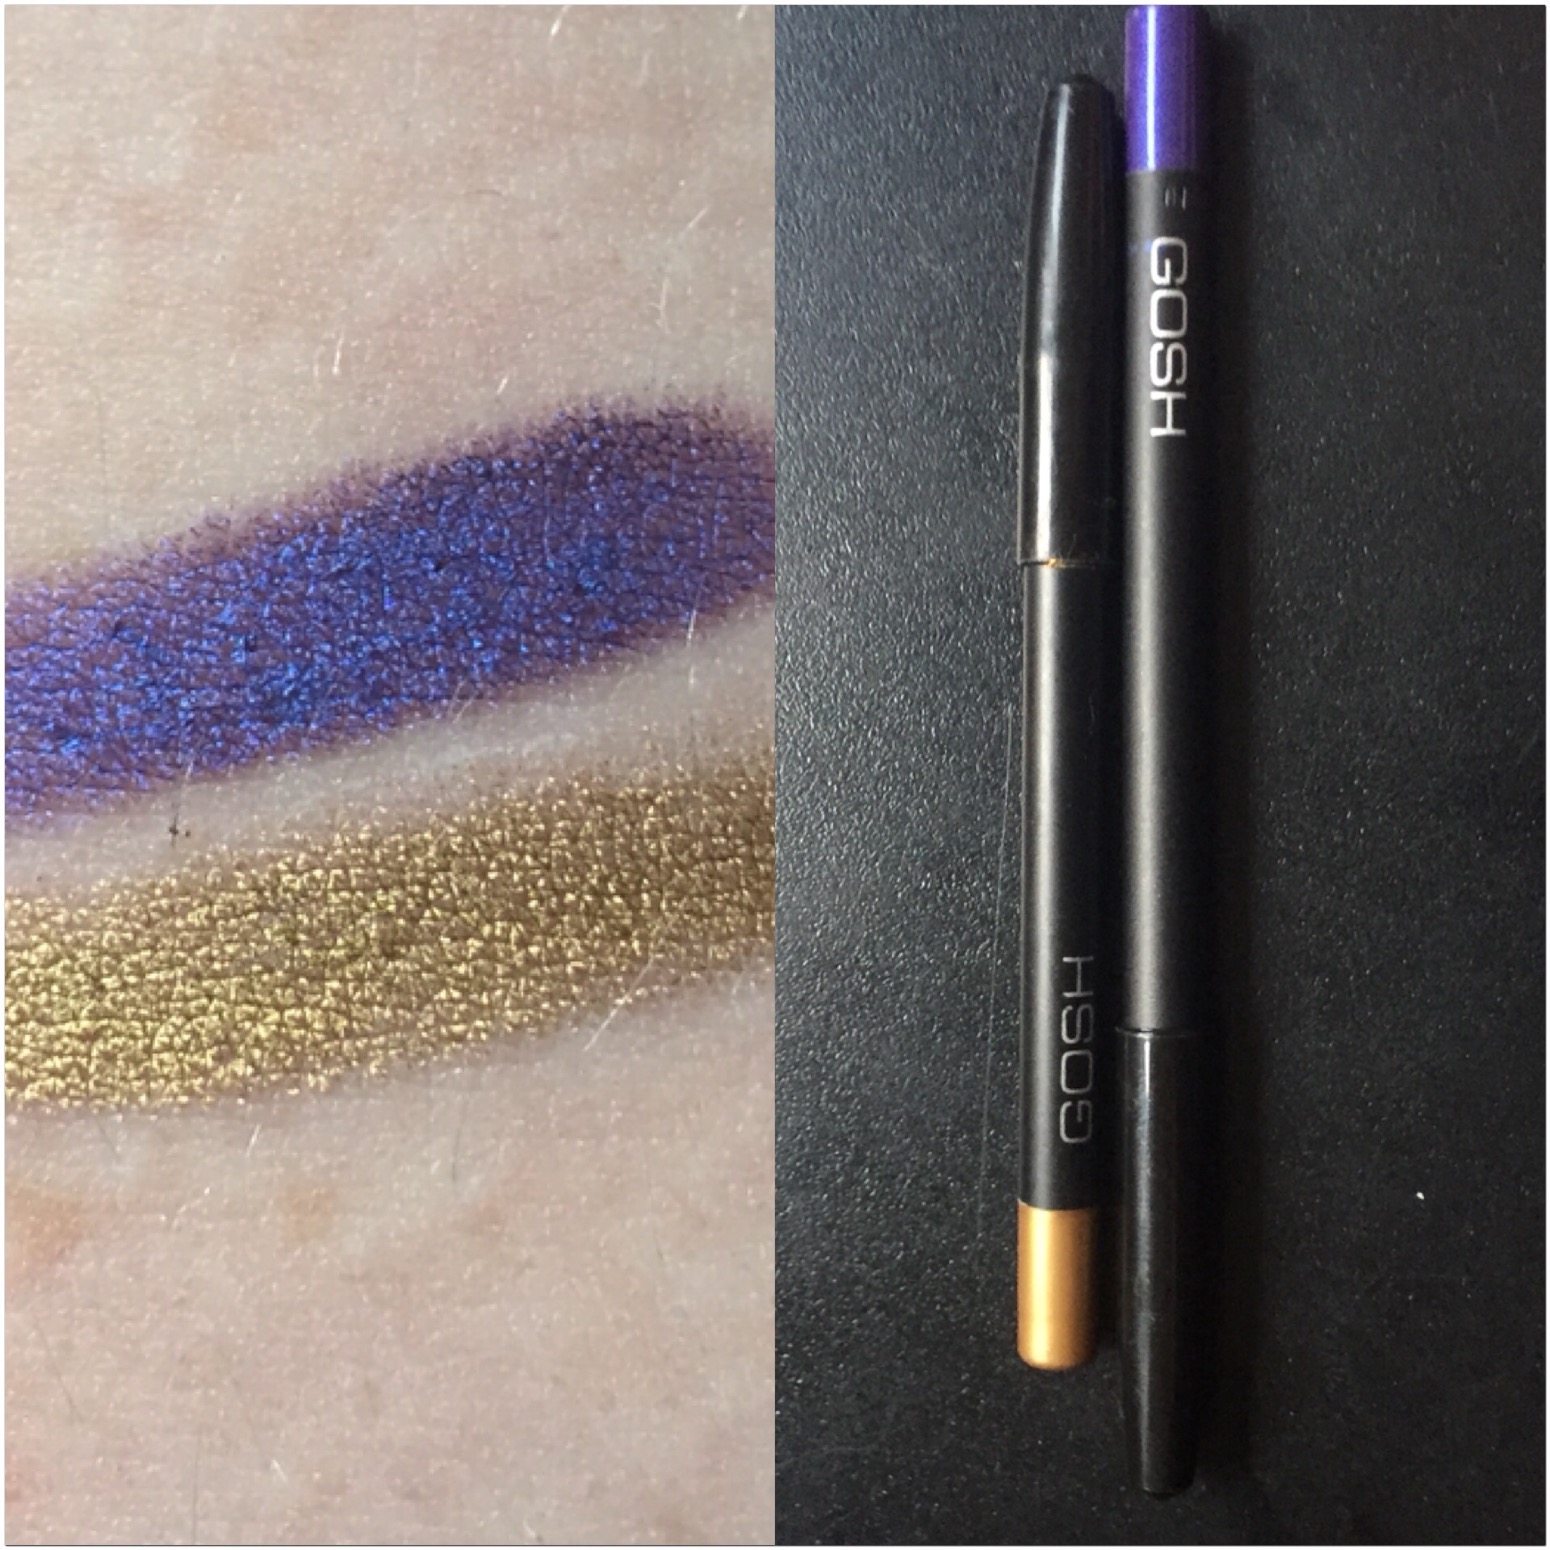
Next up we have Gosh velvet touch liners £4.99 each available at superdrug in store or online. 

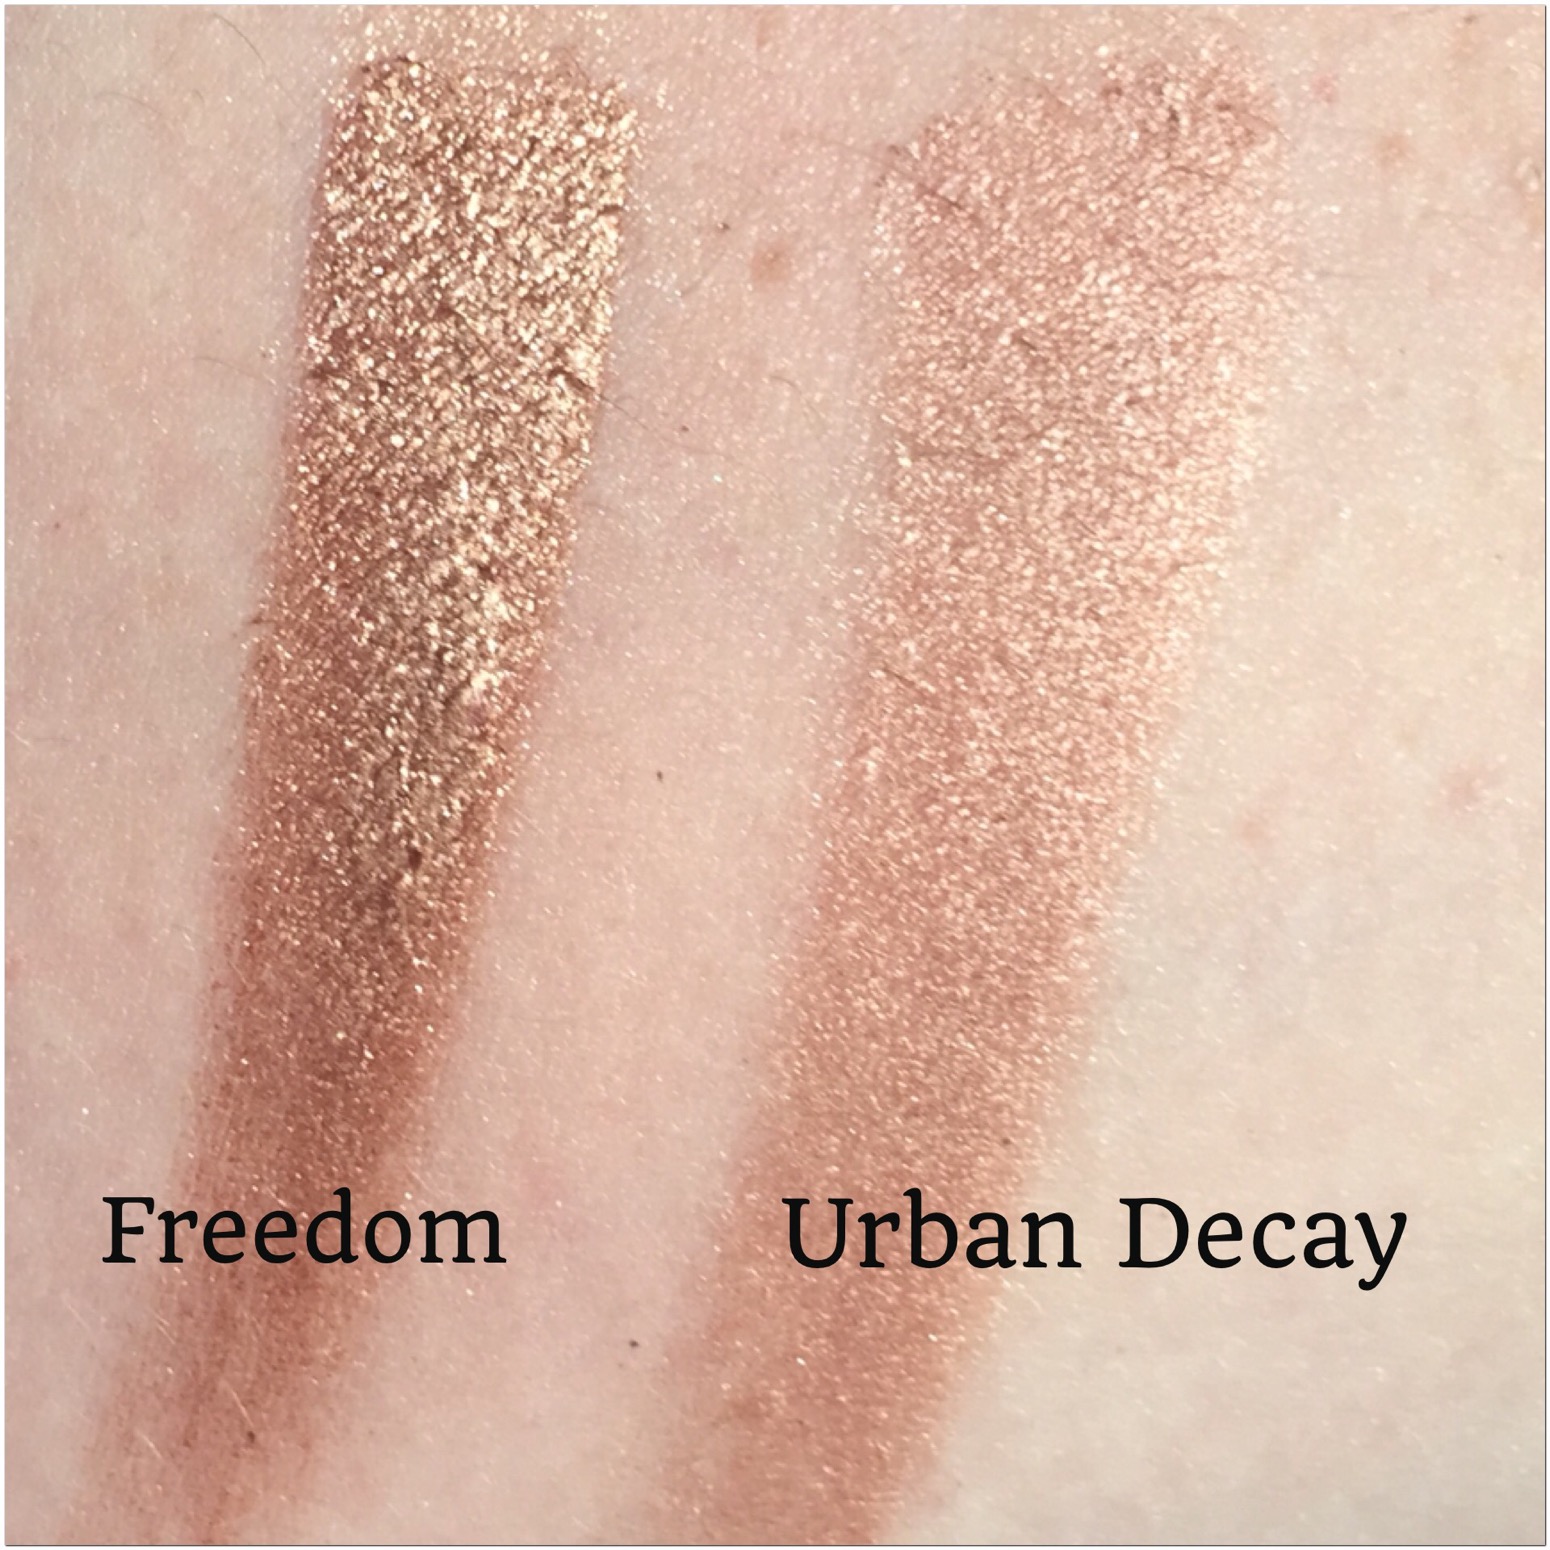
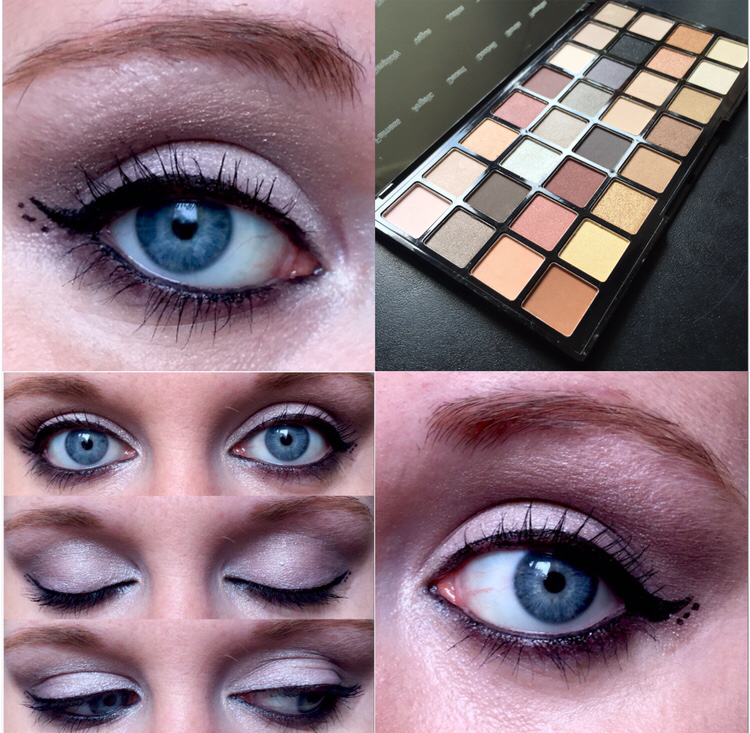
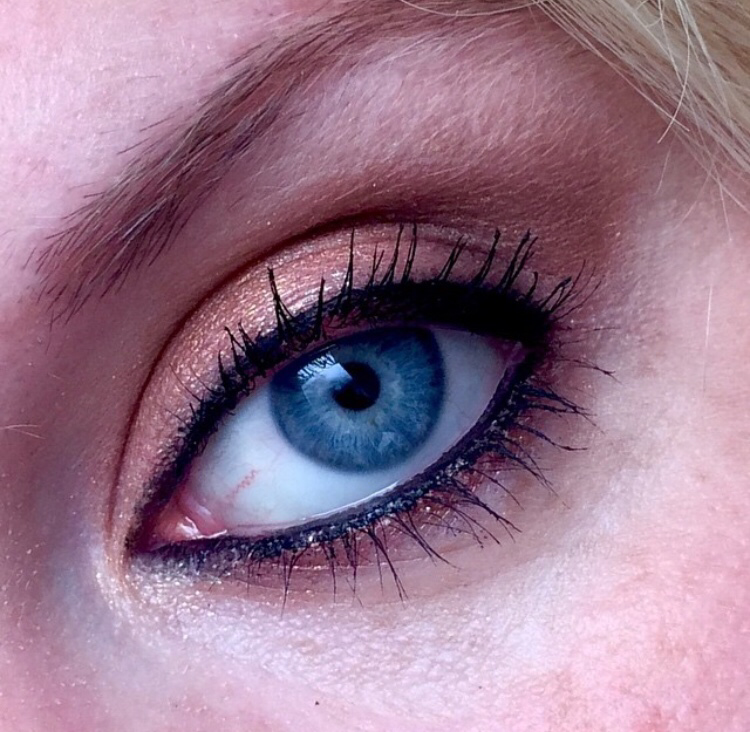
The name Velvet Touch is spot on, these liners are super creamy and glide on like a cooling gel. They are available in a whopping 19 colours so there is a vast colour choice I can’t wait to explore. I own ‘renaissance gold’ and ‘purple stain’, both really metallic and pigmented. Even on the eyes you can see the true colour and the iridescence in the purple. I tend to use the gold at least twice a week it’s such a great way to make a simple look more exciting. You get a good few hours lasting in the waterline, they last beautifully just under it, so even when it’s moved off the waterline it’s still surrounding it looking gorgeous. 

 
As you can see it looks lovely with pinks, Browns golds and bronzes,  just adds a little something that was missing before.

 
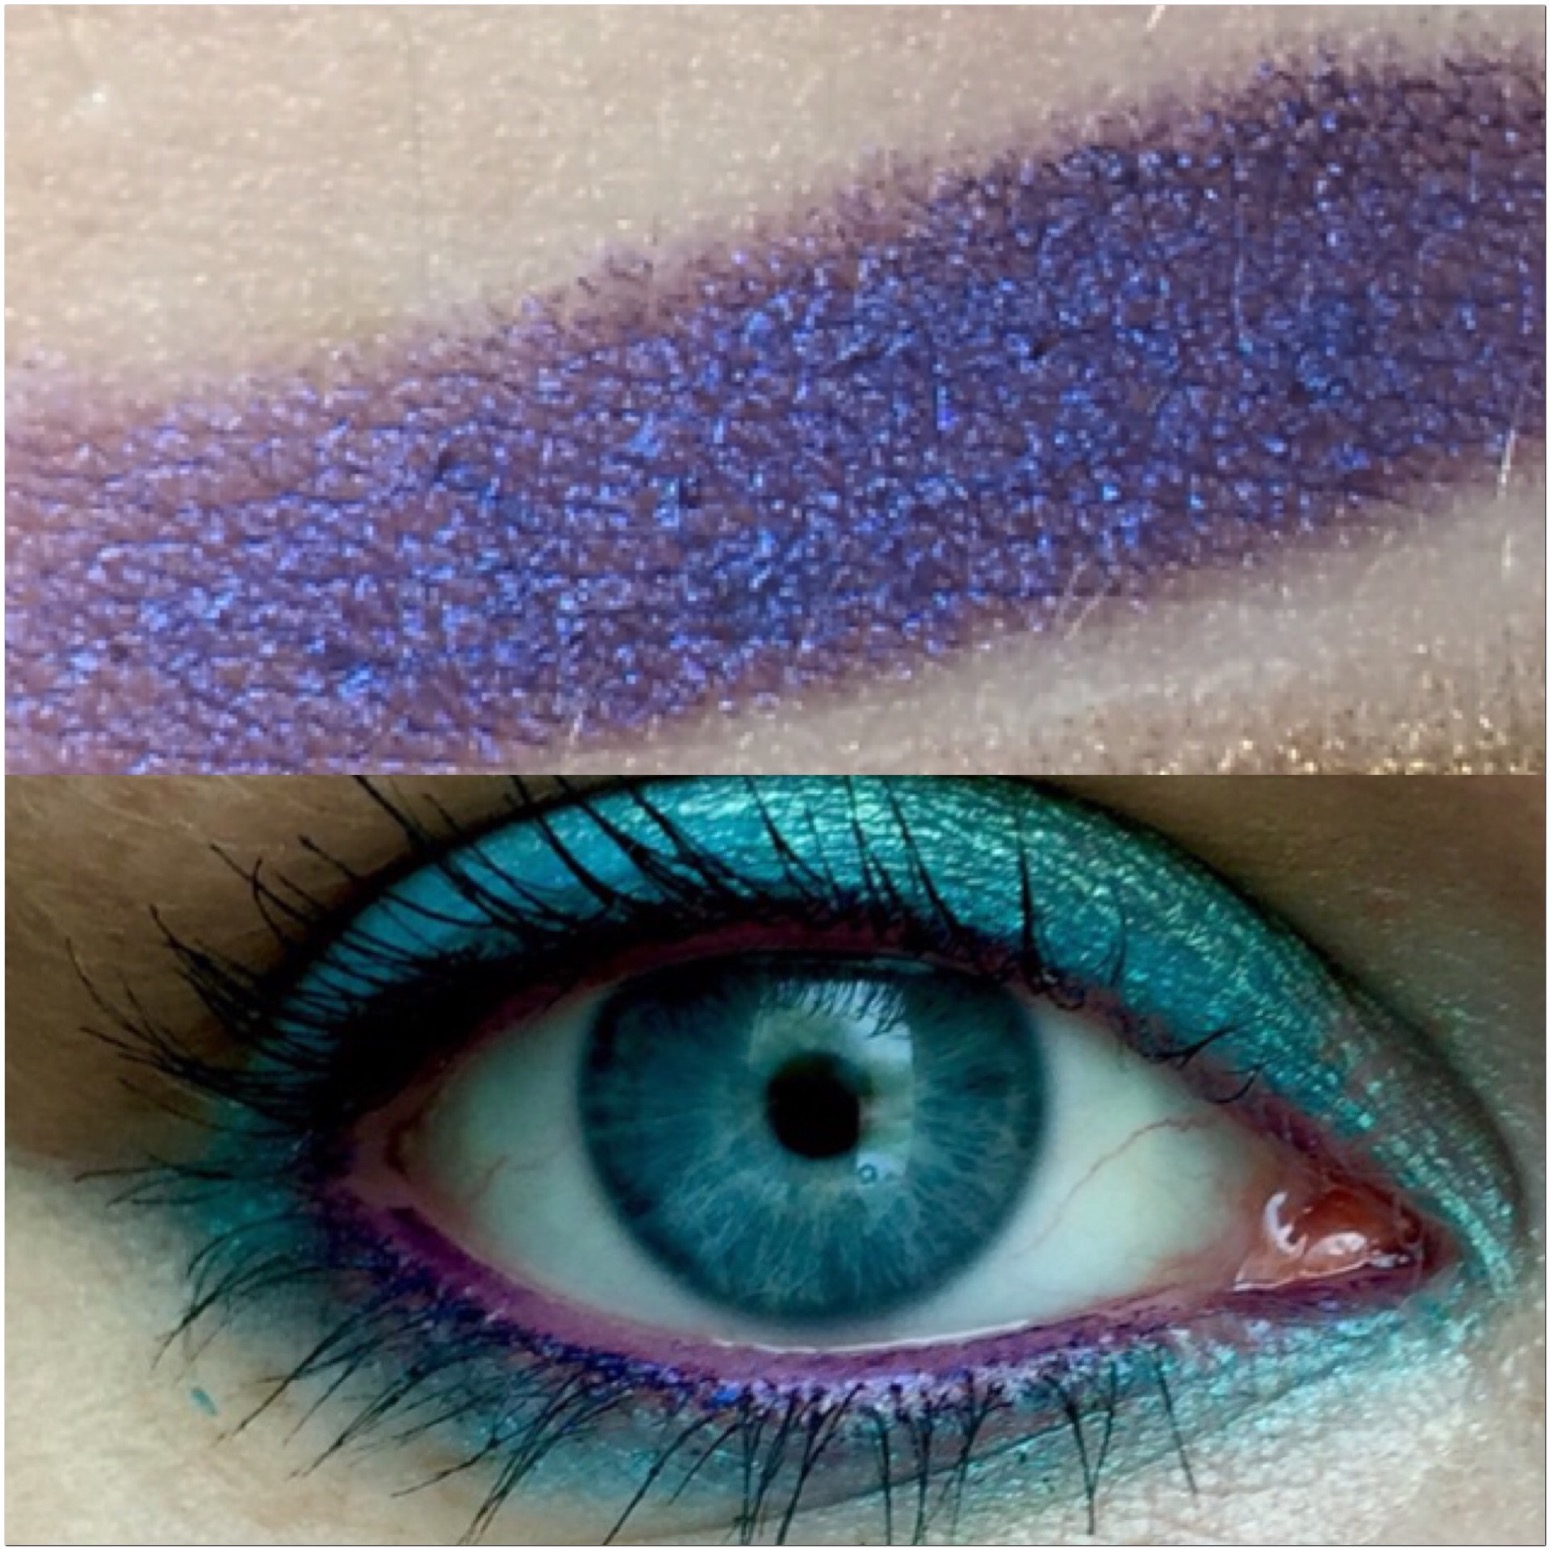
This purple gets me everything, I love using it with turquoises, blues and greens to add some depth and how metallic it is just gets people’s attention!  

 Most expensive! 

 
Elizabeth Arden. £14.45. This colour is called Sapphire 04.

Ok this is a bit of a weird one, this is not the best liner I have ever owned, which for the price I kinda would of wanted it to be…. But just look at the colour! I was hypnotised and just had to have it in my life and I’m pleased I did. I was on the lookout for a dark blue metallic liner to go with my maybelline colour tattoo in everlasting navy. I love dark navy eyes all smoked out it just look so pretty. This was a really good match! It also looks nice with bronzes and golds. I have found with these stick formulas the liner tends to be a bit more waxy than creamy, I think this is so it holds it shape in the tube. Which is great for lining under the waterline but you do have to go over several times on the waterline to really build up that colour. It also needed a touch up through the day but it was worth it for the shade of blue it’s exactly what I wanted. 

  
I hope this has helped you in some way and given you a few ideas of what to pick up if you feel like experimenting with colour. If you have any coloured liners you think I would like or would like me to review please comment below! xxx 

Mini Naked 3 Dupe! With Swatches! 


Hello my little buttons!

Here is my side by side swatch review of Urban Decays Naked 3 and Freedom Makeup Londons Pro Shade & Brighten Stunning Rose Kit mini eyeshadow palette. My Naked 3 is one of my favourite palettes, I love rosy makeup and what ever combo I choose in this palette I’m always happy with the end result. I was hoping they would do a basics palette but so far it’s not been mentioned. Now I have found this Freedom palette I’m not even sure if I would buy it! As soon as I laid eyes on the Rose kit i recognised the first half of the naked 3 instantly, when I put them side by side I was wowed at how similar they were. Or should I say identical! I feel the only thing that’s missing from the Freedom palette is a darker shade like factory or darkside but for day time looks its perect. When I swatched them side by side I was even more impressed.

  
 As you can see this is a swatch of the first shades in both palettes, freedoms is slightly more yellow and although both are pigmented urban decays did apply slighter better. This is one of my favourite base colours from urban decay Iv nearly hit pan on it I use it that often. 
 Second shade in both palettes, urban decays really is more of a glitter dust whereas freedoms is more metallic and there’s more colour behind the glitter. You can’t really tell in the photo but in real life I think that’s the only slight difference, although once they are blended out on the eyes they do create the same effect.  Freedoms is more creamy but there is more fall out because of this. 

 Third shade in the palettes, these are the closest match in colour, freedoms is maybe a hair darker but it’s not noticeable at all. Fab dupe!! 


Forth shade in the palettes, there is quite a difference here. Freedoms is darker, more pigmented and leans more towards a brown. Whereas urban decays is more of a smoky purple and is defiantly lighter on the skin.

  
I love these shades! Fifth colour in the palette, both seriously pigmented although the freedoms is slightly darker. Once on the lids there is no difference. Both shades have fall out but it’s so worth it! 

 Here is the last dupe shades in the palettes, and it really is Freedoms triumph! Look at the pigmentation!!!!! It’s super metallic, there is quite a lot of movement fallout in the pan when I put my finger/brush in where it’s so soft but I really don’t care because that colour is perfection. I’ve always found this shade in the urban decay palette to be quite stiff to work with and freedoms really is the total opposite. 
 Here’s a close up so you can stare a bit longer!  

I would also like to touch on prices and packaging, the naked 3 is £38 and you get 12 shades. The packaging can’t be beat, a pretty sturdy pink tin that snaps shut really securely and a large mirror. There’s also a great selection of darks and lights, mattes and shimmers. It’s really well rounded there is so much you can do with it, the quality of the shadows are also beautiful. Pigmented and long lasting, there is slight fall out but that really doesn’t bother me I just do my eyes before my face, problem solved lol. 

The Rose Kit is £2.50 and you get 6 eyeshadows and a highlight shade. It’s a cute mini sized palette great for touch ups throught the day in you handbag, I like that the lid is clear so if you have a selection of them you can tell which is which. It’s a shame there’s not a small mirror as I would need to carry one separately, but for £2.50 I really can’t moan. The shadows are jammed with pigmentation and with a good primer last really well. As I said earlier it’s a shame there’s not a dark colour but as the fourth shade comes out darker than it looks in the pan it helps even out the final look. 

So overal both palettes are a win for me, I like that I can use my naked 3 at home in the morning and take the Rose kit on the go in my bag for touch ups. They work so well together!  I hope you enjoyed this comparison to see more like it please subscribe! xxx 


Disclaimer: The Rose Kit by Freedom was sent to me but that doesn’t remotely effect the honest review I have given I have not been sponsored or paid to promote this product. The Naked 3 I purchased with my own money. 


Essence Kajal Eyeliner Review

 
Hello my little buttons! 

So far everything I have tried from Essence I’ve liked, so I had high hopes for this liner. At only £1 it would of been so affordable I could of bought one for every handbag!  Swatching it on my hand is was super dark and really creamy, but not so soft it squished everywhere. On first application I was really happy with the pigmentation and how easily it clung to the waterline.

  
As you can see, super dark and neat. I felt like I was on to a winner. I really wish I would of taken a photo 2 hours after, something in this liner really made my eyes water. So after my eyes chilled out a had a quick clean up and carried on with my day. Until I caught a glimpse in the mirror, it had all merged into my tear ducts! So much so it gave the illusion my eyes were really close together!!!! It had also smudged under my eyes i looked like a panda. Sadly none had lasted on my lower or upper water line at all. So disappointed! I recently looked online at http://www.wilko.com where I bought my Essence cosmetics before and they now do a long lasting gel eyeliner which I am keen to try! So sorry boys and girls this really didn’t work for me but I’d love to hear your thoughts in the comments below! Have a great weekend! Xxx 

Some of my favourite lip products, only £1 each! 

Hello my little buttons!

Thought I’d share with you some of my favourite cheapy lip products! Firstly my favourite lipliners!

 
They’re by a company called Essence! Available in Wilko Stores or at http://www.wilko.com these babies are £1 each and come in a bunch of colours. Here are a couple I love! They are sooo creamy and smooth they feel lovely on the lips. They’re long lasting and fairly smudge proof. I tend to wear them all over the lips as the colours are so pretty and they last so well. Best lip liners ever.


I’ve mentioned this little lippie before, Makeup Gallery at Poundland.i have colour 06 natural pink. I can’t vouch for the whole range but this colour in particular is gorgeous, a real pretty nudie pink. Lasts a good couple of hours and leaves a light stain which I love in lipsticks. Feels similar to a tinted balm but a bit creamier.


A recent find, Freedom Makeup London http://www.freedommakeuplondon.com these are also only £1! Really nice formula glides on the lips, doesn’t stick to my dry bits so started carrying them in my bag as they’re just so convenient!  The top shade is pink lust the bottom is whispers. They last well and again leave a slight stain. A new summer fave for sure. They also come in tonnes of colours there’s one for everyone! 

Hope you liked this post, follow me for loads more like it! xxx 

Nail tutorial- leopard print nails

Hello my little buttons!

You may not know but I’m actually a nail technician, mainly offering Gelish, which is a gel polish that lasts for up to 3 weeks. A huge passion of mine is nail art, it’s part of the reason I love my job so much. Getting to be creative and coming up with really bespoke nails for my customers. It’s also where the name buttonnailslovesmakeup comes from as my business is called Button Nails! http://www.facebook.com/buttonnails 

One design that is incredibly popular, and a lot easier than it looks, is leopard print nails. Sure you can buy nail wraps but nothing feels better than saying your nail art was hand painted. Achieving this yourself is also something to be proud of, so here are my tips and tricks on painting leopard print. I have used Gelish in these photos but it can be done with polish too you just might need to work a bit quicker. I will explain this a bit later on.


  1.  Gently push back your cuticles and shape your nails.
  2. Choose your colours! For this demonstration I chose these particular colours to make it easier to see what I’ve done but u can use nearly any colours.
  3. Base coat.
  4. Paint your nails like normal, I chose white to make the brighter colours really pop. 
  5. Cure in your light or leave to dry.
  6. Pour out a small blob of a darker colour gel/polish onto a plate or plastic lid. Something you can clean away the excess off after. For gel polish your in no rush as it won’t cure without an uv/led light but if your using polish it drys fairly quick so your better off pouring out a small amount at a time rather than wasting large amounts. Also don’t use anything fast drying at this stage as it will make this harder!
  7. Using a dotting tool (mine are £2 from eBay and came in 6 different sizes) use the tiny ball on the end to dab into the polish/gel and place on your nail making small semi circles, bearing in mind you will be adding a dot of colour inbetween. Don’t try and cram to many in, place small dots in between to add to the effect. 
  8. Cure in your light or leave to dry
  9. With your final colour add small dots in-between the semi circles then leave to dry or cure.
  10. Top coat.

Tadaaa your done! This might take some practice but once you get into the swing of it it’s easy and fun! Here are some other examples of how I have used leopard print with different colours and designs. 

  
Here I used beiges and browns but to mix it up painted a ribbon and bow. 

  
Here I used dark and light grey with white and a matte top coat.

 
Here I used yellow with grey to soften the look.

  Pale pink with soft greys is also very popular.  

  
Last but not least to add a pop of colour you can have a glittery colourful feature nail, create what you want to create and have fun doing it! xxx 

Maybelline Matte Lipsticks

  
hello my little buttons!

Here’s a quick review on some of my all time favourite lipsticks. These were sent to me by my lovely American friend after I told her I couldn’t find a comfy matte formula lipstick. Matte lips are everywhere, with every brand creating their own matte/velvet lip products. I have tried sooo many this year I had nearly given up. I tend to be fairly lazy with lip products, I enjoy tinted balms, stains and nudes that are fairly easy to top up through the day. The ones I have tried are either super drying, as in I could be lost in the saharah and have more hydration in my lips, or when they fade, which granted does take ages, just look patchy and awful. For some people this is not a problem and will happily touch up for that bold beautiful lip. Me however, it’s just not realistic. Until I tried these, I have never in my life found such a wonderful formula. It’s smooth and creamy, not so creamy it slides everywhere but just enough to make application easy and it to feel gorgeous on the lips, as well as gliding over any dry patches. They smell divine, and last for hours even after eating and drinking. I didn’t believe it till I tried it, every colour is on my makeup list for the next time I go to the USA. 

 
I love the packaging it’s pretty to look at and sturdy I’ve never lost a lid on my handbag. The colours she chose for me are also beautiful, the purple is rich and a great pop of colour. The pink in bright but not so bright I feel daft wearing it day to day, it’s made me braver with pinks, it’s so comfy on and I know it’s not going anywhere I can enjoy the colour without worrying.  If you can get your hands on these you won’t regret it. xxx

Sleek blushes- there is nothing more pigmented! 

 
Hello my little buttons! 

Heres a quick review on sleek blushes, if you don’t own any of these YOU NEED THEM IN YOUR LIFE. There is a huge colour selection in the 3 pan or single powder/cream individual pans. There really is a shade for everyone from pinks, oranges, reds, browns every skin tone is catered for. In my opinion sleek rule the high street blush market. The pigmentation is insane, you will never go through a whole one. Here are some swatches of a few I own, these are done with one swipe. 

  
From top to bottom:

  • Rose gold
  • Pink mint
  • Macaroon
  • Icing powder

The 3 pan palette is called ‘pink lemonade’ and the individual is called ‘Rose gold’

Have you ever seen blush swatches like it?! The powders are really long lasting, go on smooth and blend beautifully. The cream lasts even longer and also applies the same. The shimmery shades can work great as a highlight and eyeshadow as well as blush. You can use fingers or brushes it always looks lovely. The only think I would advise is use the tiniest bit of product it’s very easy to look like a 5 year old playing with mummy’s makeup if your not careful, better to slowly build it up and be cautious. The 3 pan is £10 and the single pan is £4.49 so super affordable and u get a lot of product for your money. I love that the palette has a cream as well as two powders it’s great for travel I always take it on my holidays. The packaging is matte black with shiny  black lettering, theres also a mirror which is always handy. These are defiantly a win in my book! Which ones your favourite! Please comment below! 

Freedom Makeup London-Pro Conceal & Correct Palette (£5!) Review


Hello my little buttons!

I bought this concealer palette with my only money as it looks just like the Mac palettes and the mixture of shades looked perfect for my fair pinky skin. First impressions, cute little compact with a clear lid so if you owned several shades it would be easy to find the one you needed. I bought mine in light but it’s available in 3 other shades as well as one corrector palette with green purple yellow etc. 

  
Here are the swatches! As you can see there’s a real selection, pinks peaches and yellows even if your colours not here the beauty of a palette like this is that you can create your perfect shade they mix very well together. They all seemed to have a super thin wax type later on the top, once I had wiped this away I was so happy with what was underneath. The formula is smooth and creamy, if your on the go warm some between your fingers and pat on. I found using a brush makes it easier to build up your desired effect for under the eyes, they can be worn sheer or more full coverage. Iv also been using a lighter colour to highlight which has been working lovely. I’m tempted to buy a darker palette to use as contour because they blend really well into the skin. I like the fact these have been coverage my blemishes which I do struggle with if I’m having a break out, they also work great under the eyes. I would recommend setting with a powder, as they are a cream. These concealers have lasted really well thought the day on my skin using my bb creams as well as thicker foundations. Overall a cracking little palette I highly recommend! 

Freedom Makeup London-Pro 32 Innocent Collection Eyeshadow Palette Review (only £8!!!) 


Hello my little buttons!

First impression of this palette was wow, it’s the perfect neutral palette. There’s a selection of warm and cool tones, mattes and shimmers. I love that there’s lots of matte creams pinks and peaches, as well as endless crease colours. To me this covers the basics; browns, purples, silvers, bronzes and charcoal greys blacks.

  
The packing is sleek and sturdy with a nice big mirror. I was happy to seeing it’s not huge either, it’s roughly 4inches by 7inches so easy to store and perfect for travel. The powders themself are pigmented, even the light mattes are lovely ,which sometimes in large palettes can be a bit of a let down. They blend beautifully and you can really build the colour up for a really dark smokey eye. For a change I decided not to finger swatch these and jump straight in to using them with my brushes and create a few looks instead. There was very little fall out and they were a pleasure to use.                                          

I know the big question floating around is are they the same as Makeup Revolution palettes? Both brands are made by the same people and the packaging is identical. I love makeup revolution and have always raved about their eyeshadow palettes, but I have to say I do think this palette is of a better quality in comparison to the Makeup Revolution large palettes. They are easier to blend, creamier, less powdery and the pigmentation is spot on. 

Here are a few looks I created using nothing but this palette:


For this look I used the silvers and dark greys, it gave my eyes dimension and really brought out the blue in my eyes. 


Here I used the more bronzey shades which is one of my favourite go to looks, next time I think I’ll use the lighter bronze shade with a damp brush to really intensify the colour and make it pop. 


I noticed some of the pinky shades are very similar to my naked 3 urban decay palette so I decided to do a natural pinky look which is one I also wear often and the end result is incredibly similar. (Blog on naked 3 dupes coming soon)

  
And last but not least is a really simple eye using creams and Browns I normally pair this with red stained lips and flawless skin (well I try) for a 50s look. It’s quick and easy but so effective, here is the overall look and yes i used the chrome filter!!! 

  
So there are my thoughts on the pro 32 innocent collection palette. I’m looking forward to reviewing more of http://www.freedommakeuplondon.com products as so far I’ve loved every single one! Please comment below if you like this palette or if there is anything you would like me to review! 

Disclaimer: This was sent to me to review but that doesn’t remotely effect the honest review I have given I have not been sponsored or paid to promote this product. 

My Top Ten Makeup Essentials I Can’t Live Without! 

Hello my little buttons!

I love reading about other peoples holy grail products they can’t live without so I thought I would share mine! This required a lot of thought and consideration. There’re so many products I just love, narrowing it down to 10 was hard. In the end I chose items that if I lost or ran out of if be straight down the high street buying them again! As well as makeup products I added several tools that I feel are just as important as the makeup itself.

  
Here are my top 10! Granted it might not look super exciting but each item brings me so much joy and really does the job. The last item is not photographed but will be revealed at the end. 

  
1. So simple yet so essential, a spoolie. My brows are fairly sparse from over plucking In my youth but the hairs are so unruly I literally can not do my brows without one! I think this one came in a brush set from eBay but they are very easily available. 


2. Elf eyelash curler. Quite self explanatory, it curls your lashes. My lashes are straight and stick right out, without one of these bad boys to help they just look flat and odd. It also really opens up the eyes making you look more awake and ready for the day. 

  
3. Real techniques powder brush. This is my favourite powder brush ever! I literally use it every day. It picks up the perfect amount of product, you can either lightly dust your face or build it up. It helps distribute the product to avoid cake face! 

  
4. Makeup Revolution Ultra Brow. Since buying this I’ve not use any other brow palette which I find amazing lol. There are 4 powders, 2 waxes, a cream highlight and a powder highlight. As well as mini tweezers that actually work, a brow pencil and two little brushes. I love the colour selection I can go light or dark or mix up my own to suit what ever look im going for that day. 

  
5 & 6. Rimmel scandal eyes eyeliner pencil in black and nude. I couldn’t choose just one. The black is super dark, soft and creamy and lasts so well on the waterline. No matter which eyeliners I try I always come back to this because nothing compares! It’s the same with the nude it lasts better than anything else ive tried and really brightens up the eyes. Really want to try the other colours in the range they look fab. 

  
7. Bourjois color boost in proudly naked. This lives in my handbag, it’s the perfect nudie pink which suits nearly any look. It’s a chunky balmy pencil that is easy to apply on the go and feels so comfy on the lips. 

  
8. The Body Shop honey bronzer in light matte. I never thought I could find a bronzer that wasn’t too dark or orange. Until I found this! It blends beautifully on the skin I love dusting it all over or concentrating it on the cheeks as a gentle contour. I also have to mention the packaging, it’s stunning!! Love the honey comb effect as well as the pattern on the powder itself, such a nice touch. 


9. Rimmel Lasting Finish 25hr nude foundation with spf 20 medium coverage. Available in 8 shades. I’ve found myself reaching for this more and more. I love how it makes my skin look and how light weight it feels on. I tend to use my fingers or a buffing brush to apply, it’s nice and easy to build up, you can defiantly get full coverage with two light layers of the foundation and after using concealer and setting it with powder. You can matte this foundation or glow it up with highlight and bronze. When ever I wear it I always have people telling me how good my skin looks, I just love it! 


10. Ok this was a total cheat, but I couldn’t pick just one eyeshadow palette. I’m a total eyeshadow junkie I love every single one and use every single one. So I decided my number 10 is eyeshadow palettes in general! I love having colours already put together for me, only having to grab one item to do a whole look and playing with different colours I otherwise wouldn’t of bought on their own. I think they’re the best invention ever and I don’t think I’ll ever have enough!                        I’d love to hear some of your top products please do comment below and subscribe if you’ve enjoyed this article and would like to read others like it.